It’s getting to be that time of year again.

19 Oct

Well, the holidays are just around the corner. While I’m working on finishing (okstarting) my Halloween costume, I’m also making a list of items I would like to make for gifts.

However, the one thing I always procrastinate with and always am less than thrilled with the results is purchasing gift-wrap.

I usually end up heading to Target as they have slightly more modern gift-wrap styles (I am a little more minimal with my taste and am not as fond of traditional styles). However, the rolls always have very little paper (it seems), and never seem to have what I want.

Well, since one Christmas gift is already in my home, I began to think of my normal gift-wrap dilemma. Which is great because now I have time to look and see what my online options are.

Enter Superior Gift Wrap.

Their rolls seems to be 100′ at default, which is great. And they have a ton of different patterns along with some bags that would match and ribbons and bows. I picked up my 4 favorite Christmas designs and one design for general gifts that one gives throughout the year (birthdays, housewarmings, etc.). I cannot express how happy I am to actually be on top of the gift wrap dilemma this year.

Maybe I’ll even do Christmas cards this year…

Double Post to make up for my lack of Posting

9 Oct

Wow – almost a month has flown by already and I haven’t posted. Don’t you love how life just gets away from you sometimes?

The reason for the lack of posting is that I left my 9-5 and have become a housewife temporarily. This is a good thing and both my husband and I are happy with the decision. Ultimately I hope to get the house in order (which is has seriously gotten out of – if it was ever in order) and then try and focus and see if my craftiness might be able to be a career for me. I’m working on my chain making skills and also have a whole new book of historical corset deisgns (and as everyone tells me, Corset making is big money…we’ll see but they can be expensive).

I also have an awesome Halloween costume to work on, but that has to wait until after the in-laws come visit next Saturday, since cleaning is the priority until then.

So, what do I have to share with you today? Well…

  • Etsy lovers, meet the dark side “Regretsy“. WARNING: may contain mature content.
  • I’ve seen so many beautiful (but expensive) clutches over at Etsy lately. Surely, I could learn to make my own using awesome fabric I find. Sure enough, I did.

That’s all for today. I do have one small project I will document and hopefully post in the next week. Mainly, my cat Jayne (it’s a boy cat – think Firefly), has fallen in love with the slightly broken papazaan stool chilling out in my living room. It is rare he finds cat beds he likes, so I’d like to keep the stool, but make it a little more modern living room friendly. Not 100% sure how I’m going to accomplish that yet, but I have some ideas. Plus I don’t want it to fully break while he’s sleeping on it, so I need to fortify it as well.

Stay tuned!

Etsy Spotlight

14 Sep

I am an Etsy Stalker and proud of it.

Therefore, I thought it would be a fitting thing to do a recurring series spotlighting local, Seattle-area Etsy shop owners! Gotta stimulate that local economy, you know…

So, without further adieu, I give you Strung Out Designs

This is Rockstar elegance at it’s finest. Simple lines and lovely feminine shapes – but totally unique!

Tell me these aren’t just gorgeous. The grace and elegance of this work is just astounding!

And they’re all so fabulously priced! $18-$20 for a pair of one-of-a-kind gorgeous earrings? Sold!

Craft Gawker

3 Sep

Since we all know I love to gawk.

For all of us Etsy Stalkers and just to add more project ideas to my list, Apartment therapy just posted this new website: http://craftgawker.com/
Some of my favorites from the first few pages:

Have Fun and Be Inspired!

Cupcake Bites

30 Aug

I decided to try Bakerella’s infamous Cupcake Bites – I was not disappointed.

Original instructions can be found here.

So I baked my cake – er, cakes. I did chocolate and yellow butter cake:

028

Crumbled ‘em up and mixed in some vanilla icing:

039 040

Made them into little balls and froze ‘em:

034

And apparently forgot to take any other pictures of the “making” of the cupcake bites. But it’s really easy. Just fill your candy molds about half full and drop a cake ball in until the chocolate reached the top of the cup. Stick in the fridge or freezer for a bit and let the chocolate cool.

Then, you take the cake balls out with their new bases and dip them, top side down into another colored candy coating of your choice. Top with some sprinkles and maybe an M&M:

043

And there you have it!.

I have to say though – sorting M&Ms is just one of those things that makes you feel a little insane – and very much OCD.

I wrapped mine up in a couple of boxes, decorated with some stamping pizzazz, and sent them off as thank you gifts. We’ll see how they make it in the mail…

047

Cranky Crafting

22 Aug

I attempted two large projects last weekend. First were some plaster of paris cupcakes. Second was Bakerella’s infamous Cupcake Pops.

Both had their own personal brand of failure, and therefore will be reattempted this weekend. I learned that very few things make me crankier than less than perfect crafting projects…

On the bright side, my husband thinks the fail cupake pops are tasty – so at least they’re not going to waste!

The Woes of Apartment Life.

15 Aug

I cannot use power tools and I can’t build anything into the walls.

So I can’t take on a project as awesome as this:

image

image

Seriously. How awesome is that shelving idea?

via Apartment Therapy; Designed by Isabel Quiroga.

New Book

11 Aug

I bought a tome full of inspiration this weekend:

Say what you will about the Domestic Diva – she knows what she’s talking about.

the project on the front cover made me hesitate to buy the book on Amazon, but I had a coupon to Barnes & Noble (where I also have my 10% club card) and time to kill on Saturday afternoon. So, I dropped by and leafed through the book.

And I was so happy I did – Silk screening instructions! Beautiful clay flowers! Handpainted teapots! So many projects to add to my every growing list. Also, the book is brilliantly arranged. Each chapter introduces a new craft (silk screening, paper flowers, beadwork) and gives you a few projects to get you used to the process and practice your skill. Each section also drops hints for other projects you might apply this particular technique to, opening the door to your inner creativity.

Say what you will, but I like Martha.

Pie Bites and Dressform Fun

10 Aug

So this weekend was productive, despite a complete loss of Saturday and Sunday morning due to an overnight stay in Seattle. Unfortunately, one of my projects did not turn out as well as I would have hoped.

Project #1 – Finishing my dress form.

A couple of months ago, I purchased this dressform from Jo-Ann’s when it was seriously marked down (over half off when all was said and done). Aside from non-adjustable forms (which are crazy expensive – especially if you et one made to fit), this is probably the best dress form on the market.

However, I had two major issues with the form. I am fairly busty and the form is not. I also have a tummy, which I would like to take into account when making clothing, and the adjustable form really only expands out, not taking into account some areas being poofier than others.

So, being the Cheeky Craft Chick that I am, I went and got myself some batting. Then I took one of my bras (which the underwire had just torn through, making it perfect to donate for this project), and put it on the dressform. I stuffed the chest of the bra to fill out the difference and then added some batting to the stomach and rear end of the form, wrapping it into place with some thin quilt batting. Very often (in costume shops ’round the world), this is how a padded dress form is left to be used.

However, I am a little OCD.

So, to make the dress form look more presentable, I used some old blue cotton fabric I had leftover from my wedding two years ago and made a cover for the newly shaped form. Basically, this simply consisted of draping the fabric on the form, and creating seams and darts where necessary – much in the same way you would design a garment via draping.

Then I marked one of the side seams, unpinned it, and removed it from the form. I serged all the newly created seams together, leaving that large side seam unsewn (well, I serged the edges, but did not sew the fabric together).

Then I replaced the fabric sheath onto the form and sewed it onto the form by sewing that last seam together. the result was a fairly visually pleasing, and Cheeky Craft Chick shaped dressform.

Project #2 – Pie Bites

This project went fairly smoothly, though I was disappointed in the bites themselves, but I’ll expand on that later.

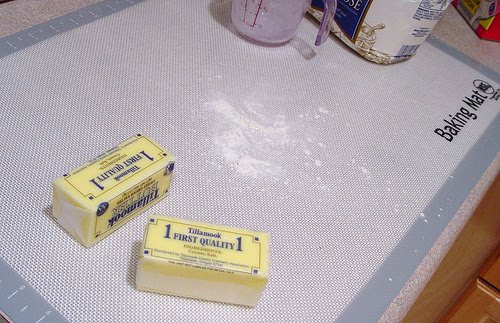
First things first. I love my baking mat.

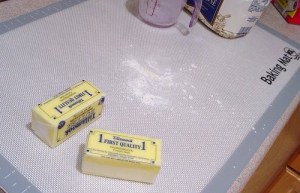
I only just recently purchased this item and this was my first project with it. Completely worth it. It is larger than a cutting board and easier to clean then the counters (not to mention I just feel a little weird kneading and rolling dough on the counter directly). It’s also silicone, meaning if you wanted to just toss it on a cookie sheet (well, I’d need a bigger cookie sheet), then you can. It also held the flour beautifully and just was a charm to work on.

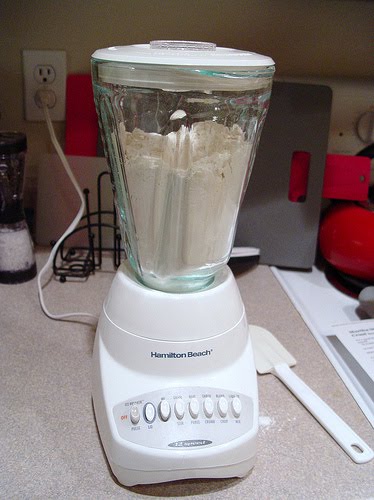
However, I think I need to invest in a food processor. The “Martha Stewart Foolproof Pie Crust Recipe” probably would have seemed at least a little closer to the cinch it was purported to be if I had the right equipment. Instead, I used my handy substitute:

Which was a real pain in the tuckus and took absolutely forever to do it’s job. I am now convinced I need a food processor.

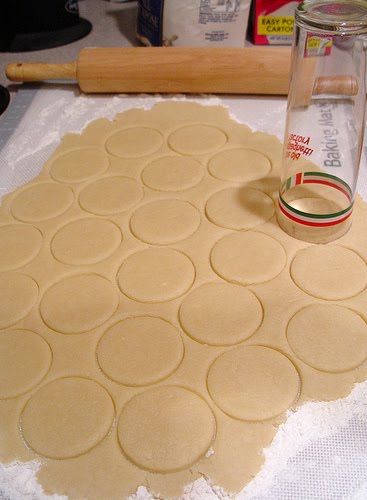
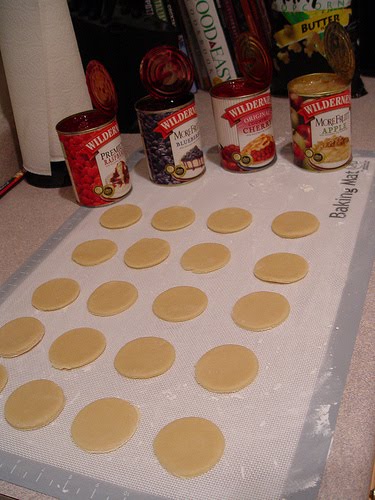
But I got the pie crust fixed and rolled out. And I cut all the little circles I could:

And laid them out in neat little rows:

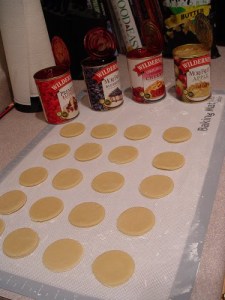
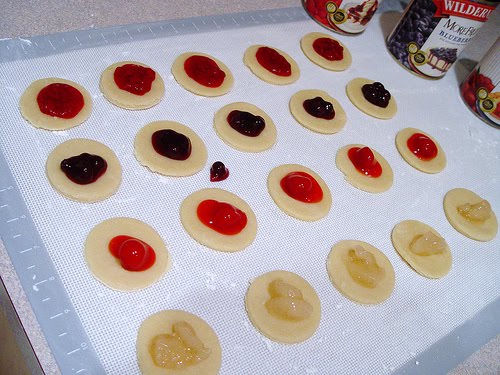
And topped them with 4 varieties of sweet goodies:

(as you can see, the sweet goodies tried to escape, but I managed to keep it mostly neat for the picture – a major accomplishment for me)

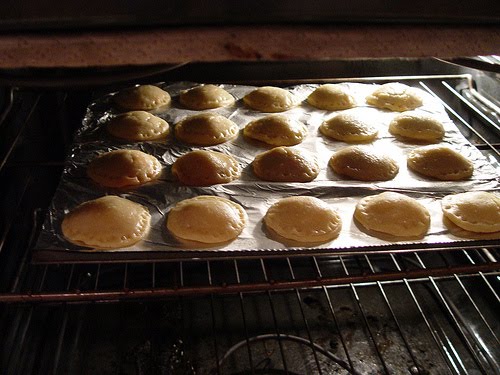
Then I topped them with another pie crust circle, molded the two pieces together, brushed ‘em with some egg whites and let ‘em bake for about 20 minutes.

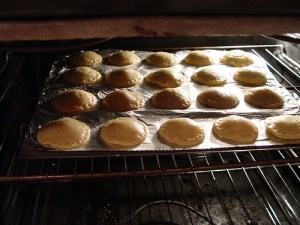
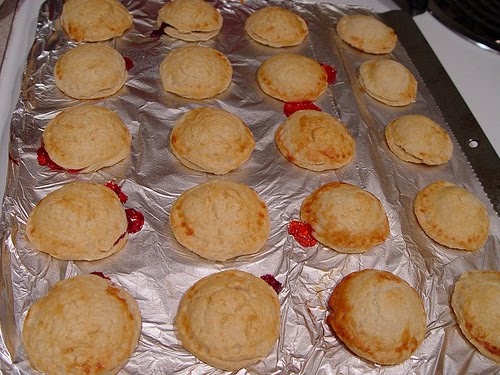
And they came out looking like this:

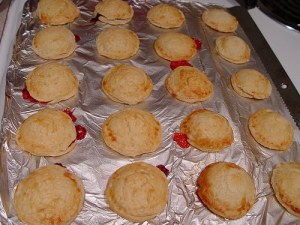
And they smelled so lovely. So I let them cool a bit and popped a few into a bowl for my husband and I to try.

Note: I generally do not like pie. Jeremy was a crucial player as he does, in fact, like pie – so he can tell me if it’s good on the pie scale.

Both of us concluded they had potential, but had waaaaay too much crust to fruit ratio. Kinda like eating a dry biscuit with too little jam. Not a huge fan.

Which means, I’m certainly not going to send them to other people as thank you gifts.

Which means, I still need to think of a thank you gift. *sigh*

However, the pie bite is not completely dead in my book. I am contemplating securing some puff pastry (from the store if lazy, from a Julia Child cookbook if I feel inspired) and using that as the wrapping for the sweet, fruity yumminess.

But first, I have a great idea for a skirt I’m hoping to explore next weekend as my dressform is ready for work.

Stay Tuned! And happy crafting!

This Weekend – Thank You Gifts

4 Aug

So my mom and stepdad have done something incredibly nice for my husband and I. I have been racking my brain for a suitable thank you gift. The major hang up has been that the gifts I could think of would really only excite one and not the other. I very clearly want one gift to the both of them, but what to do?

Then Bakerella posted this on her blog on Sunday.

So, I’m thinking…

+

…might just equal one cute thank you gift that both the parent’s can enjoy.

Now to make my shopping list…